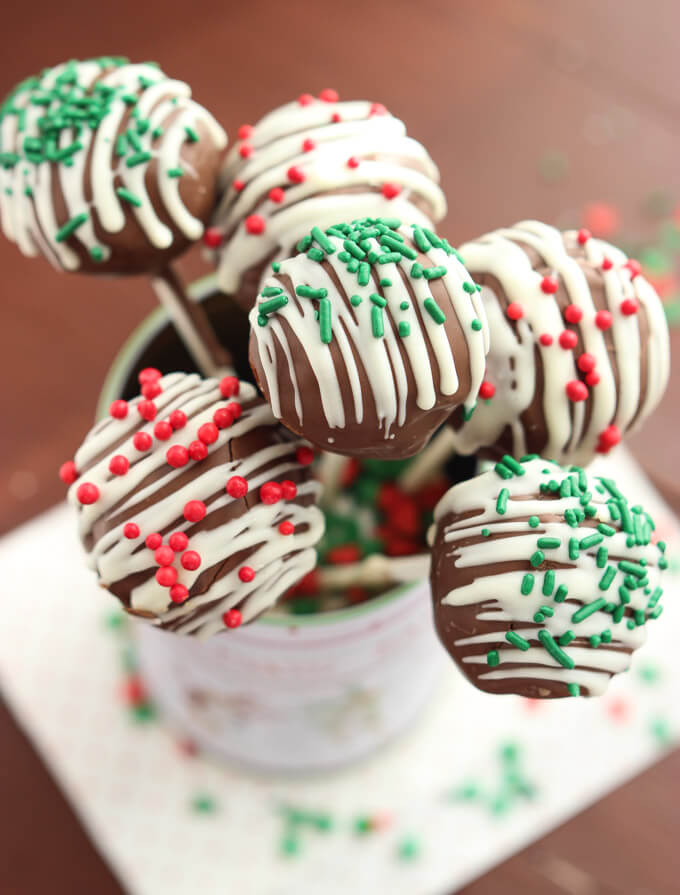
Simple Christmas Cake Pops Recipe (How To Without Cake Pop Baking Pan)
These homemade Christmas cake pops are super simple to make—no special molds or tools required! Just a few basic ingredients, a little creativity, and you’ll have the perfect bite-sized holiday delights to share with family and friends!

Jump to:
Simple Christmas Cake Pops – no special pan required!
So, these cake pops have been on my mind for a while now. My sister-in-law made these adorable girlie cake pops for her 7 year olds birthday and since then I’ve been playing around with the idea of making my own.
What caught my attention was the fact that she made the cake pops ALL by hand and no special baking pans were involved. It’s probably a little more work than going the baking pan route. But if you’re like me and always try to minimize kitchen clutter then this is the way to go.
The success of these cake pops all lies in the cake mixture. If it’s too soft the cake pops wont work. So my suggestion is to follow the time directions in the recipe. Then just see for yourself whether you need to chill the cake mixture a little longer or not. You will be able to tell quickly if the cake mixture is too soft as the cake sticks wont hold up and your cake ball will fall off.
What You’ll Need for Holiday Cake Pops
See the recipe card for full information on ingredients and quantities.
- All-purpose flour: This forms the base of the cake batter. If needed, you can substitute a 1:1 all-purpose gluten-free flour.
- Sugar: We use granulated sugar, but cane sugar will also work to add a touch of sweetness.
- Eggs: Bind the batter together.
- Buttermilk: This helps combine the ingredients, making the cake fluffy and tender.
- Vegetable oil and unsalted butter: Add richness to the cake and help keep it moist.
- Sweetened condensed milk: Keeps the cake balls moist, enhancing their flavor and helping them hold their shape.
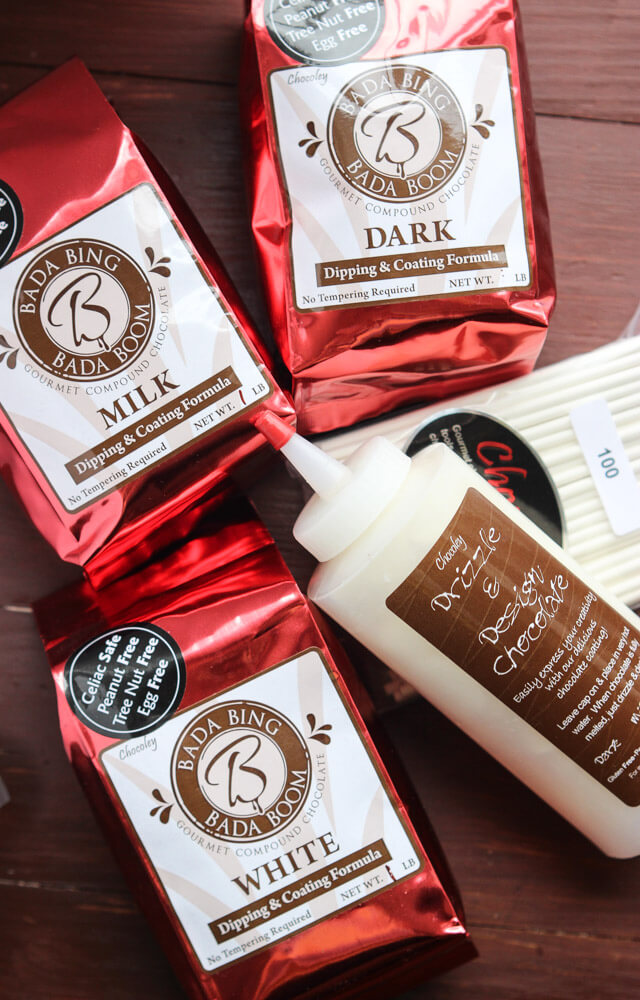
- Chocolate candy melts: Use white, milk chocolate, or dark chocolate candy melts.
How to Make Christmas Cake Pops
You’ll need a 9×13 cake pan, two medium bowls, a large bowl, a hand mixer, two large baking sheets, pop sticks, and a deep microwaveable bowl for this recipe. Check out the recipe card below for detailed instructions.
Step One: Combine the dry cake batter ingredients in a medium bowl, and set it aside.
Step Two: Mix the wet ingredients in a large bowl until smooth. Then, gradually whisk in the flour mixture.
Step Three: Transfer the cake batter to a greased cake pan, and bake until a toothpick inserted into the center comes out clean. Cool the cake in the pan or on a wire rack.
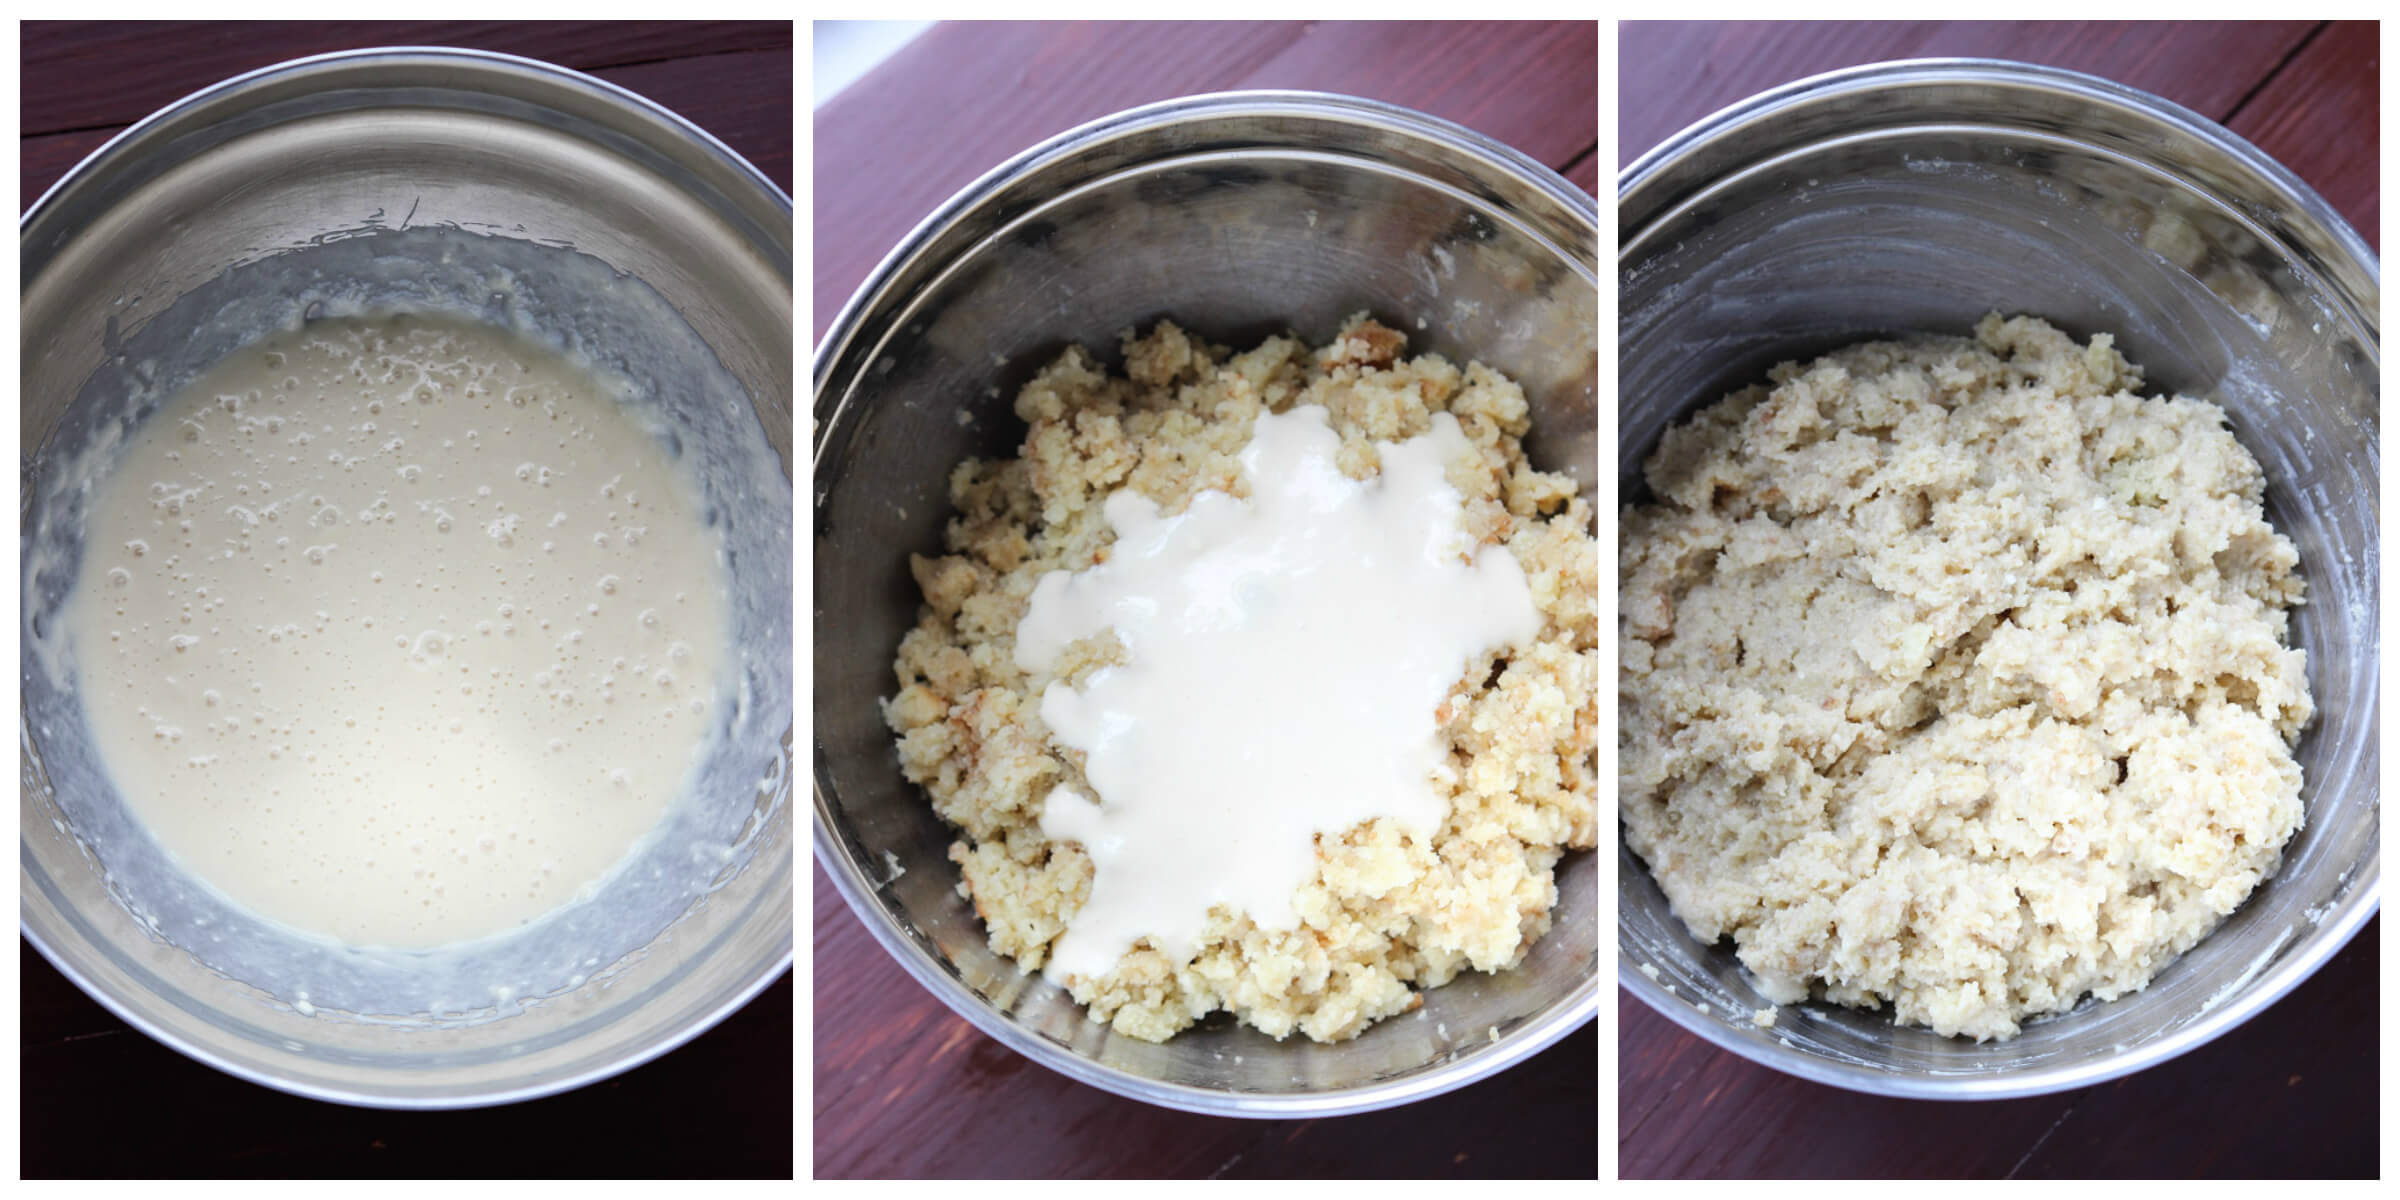
Step Four: In a medium bowl, cream the butter on medium smooth until smooth. Add the condensed milk, and beat to combine.
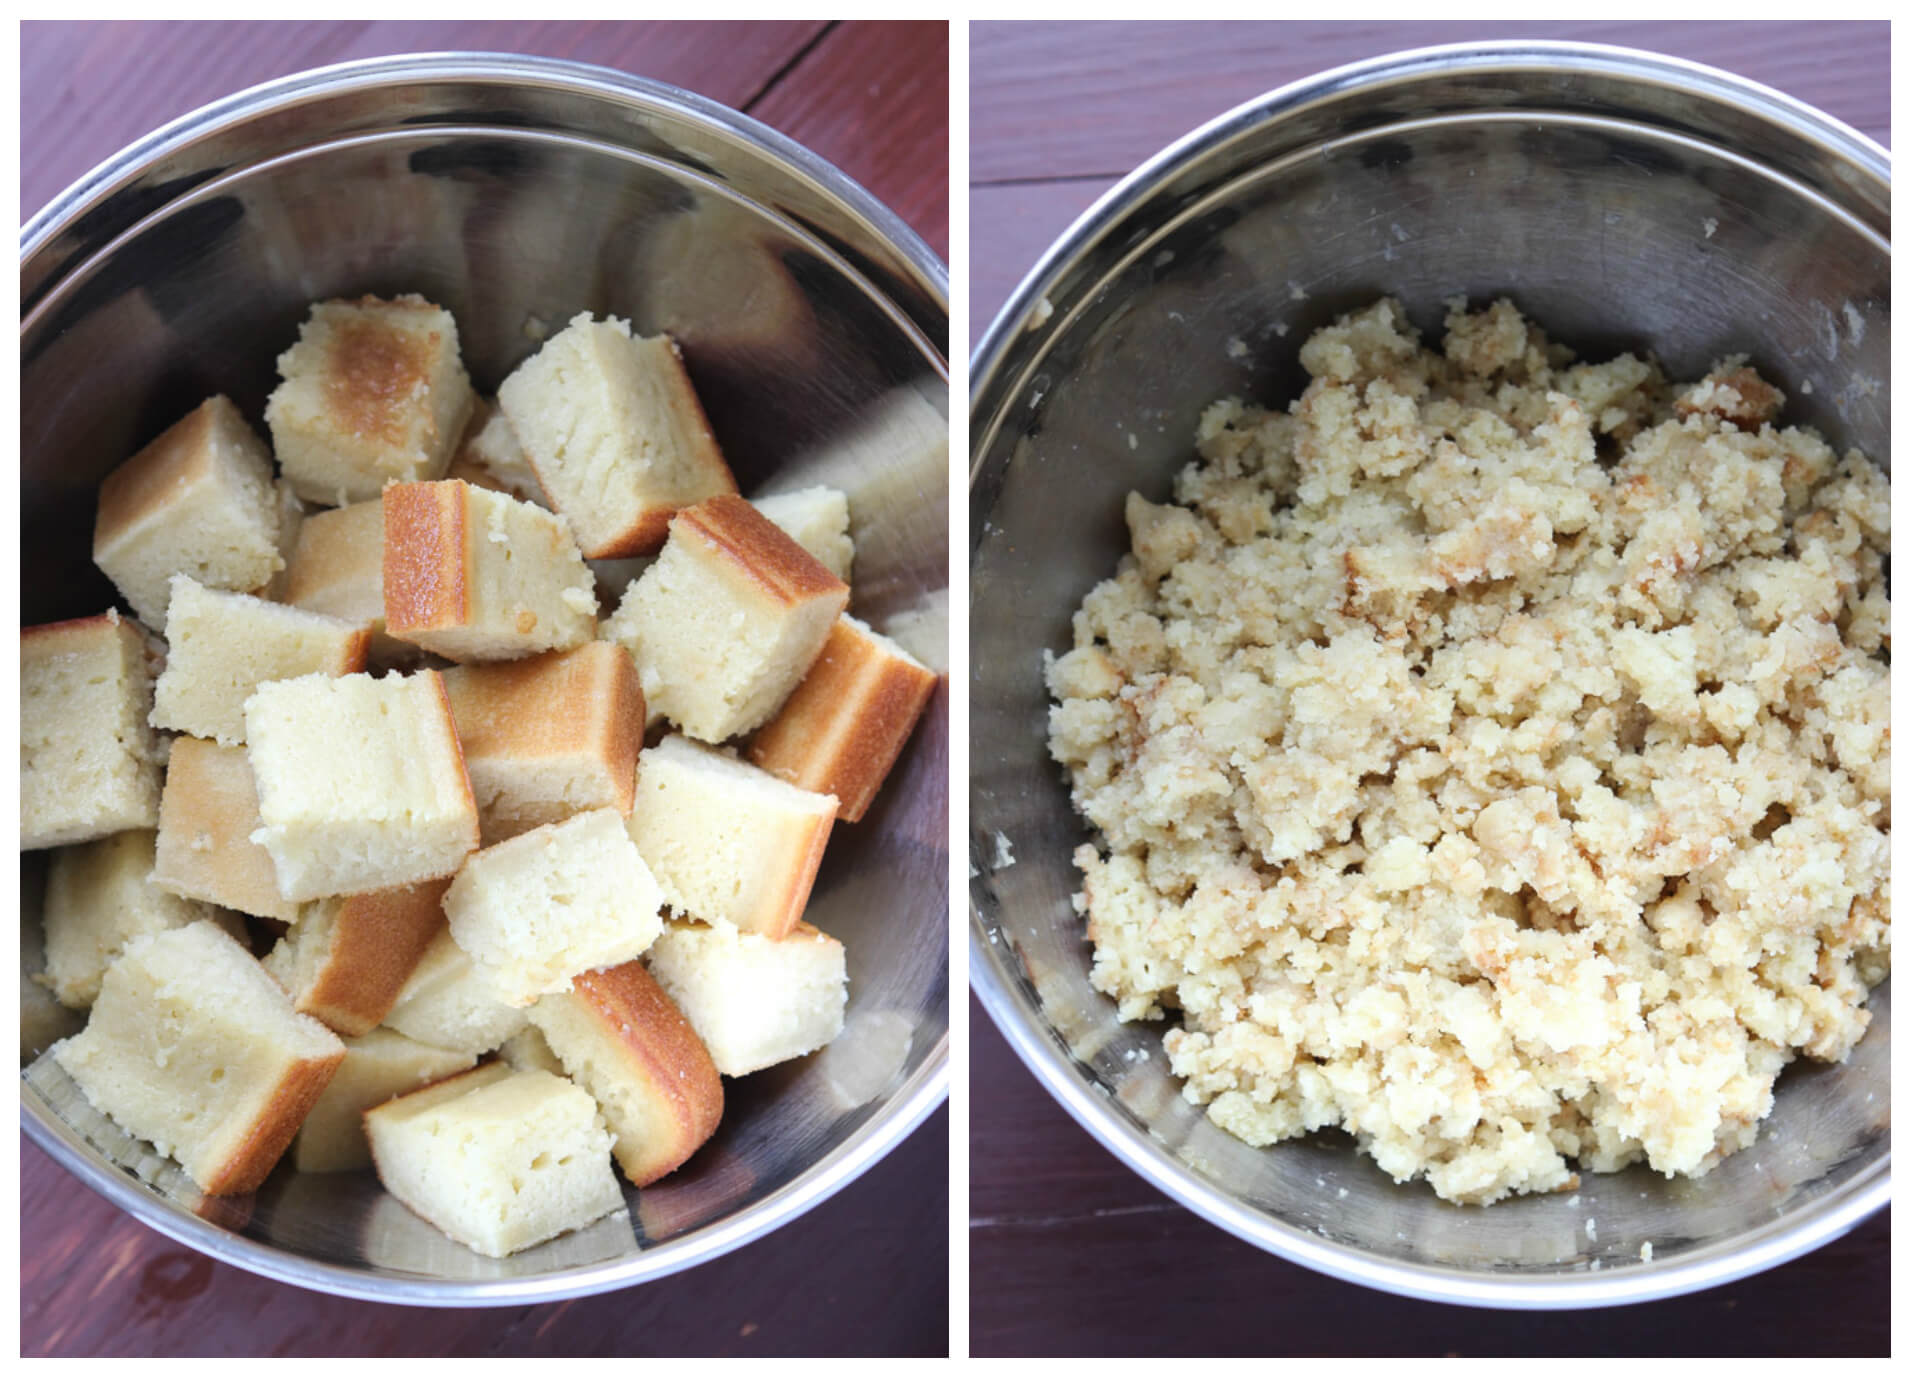
Step Five: Cut the cake into small pieces, and transfer the pieces to a mixing bowl. Use your hands to break the cake up, creating a crumbly consistency.
Step Six: Add the condensed milk and butter mixture to the cake crumbs, and mix to combine. Cover the bowl with plastic wrap, and transfer it to the fridge to chill.
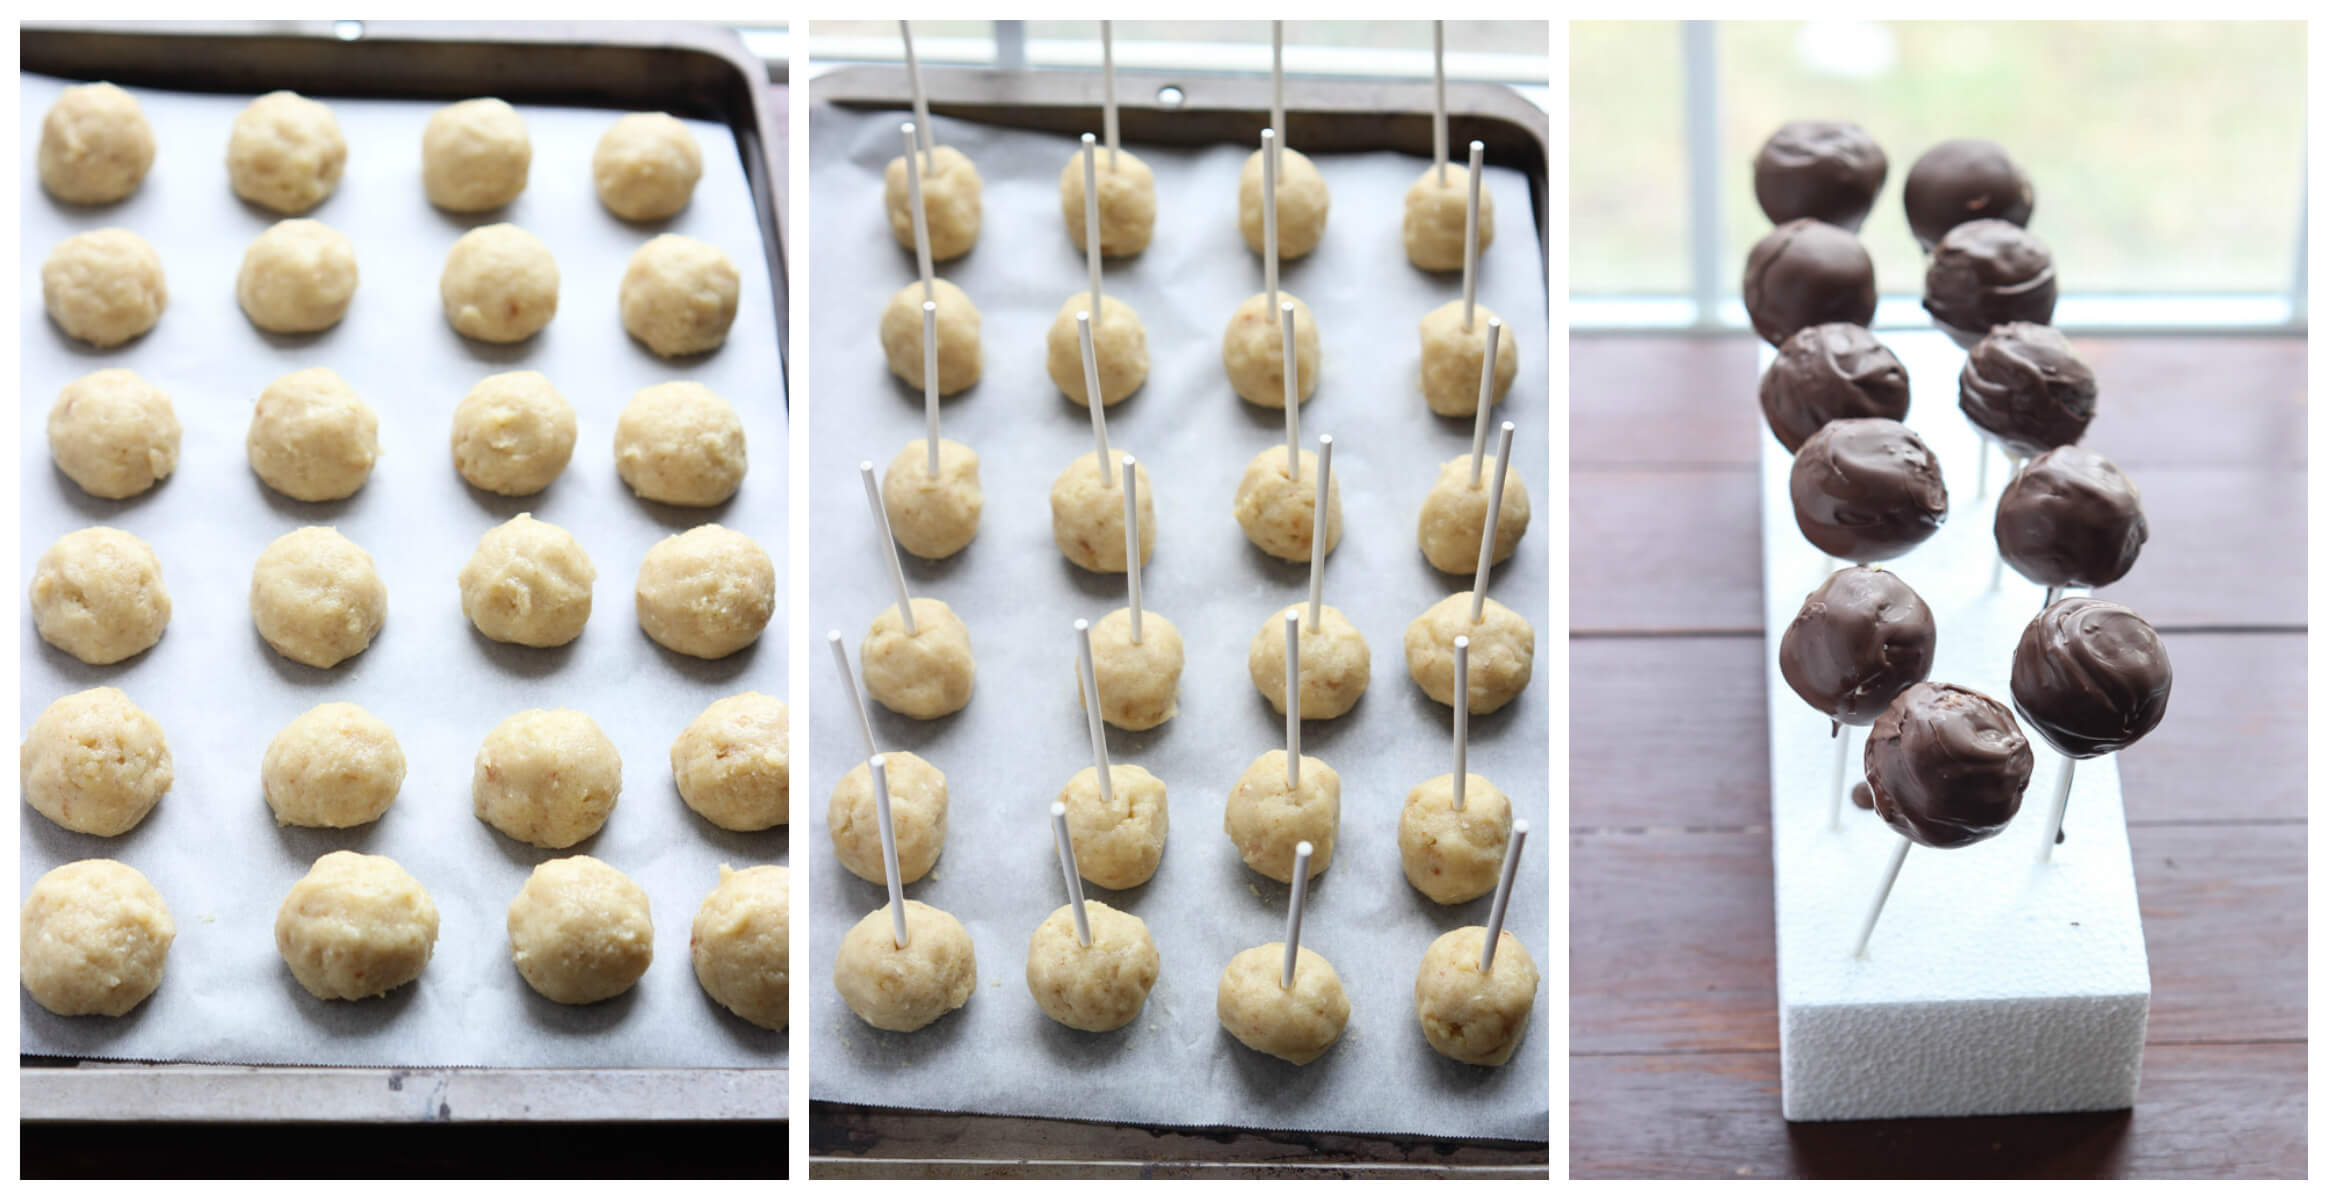
Step Seven: Portion the batter into equal-sized balls, and place them on parchment paper-lined baking sheets. Chill again.
Step Eight: Insert pop sticks halfway into the cake balls, and chill in the freezer.
Step Nine: Microwave half the candy melts until smooth, and dip each cake pop into the chocolate, coating it evenly. Repeat, and decorate as desired.
Christmas Cake Pop Ideas
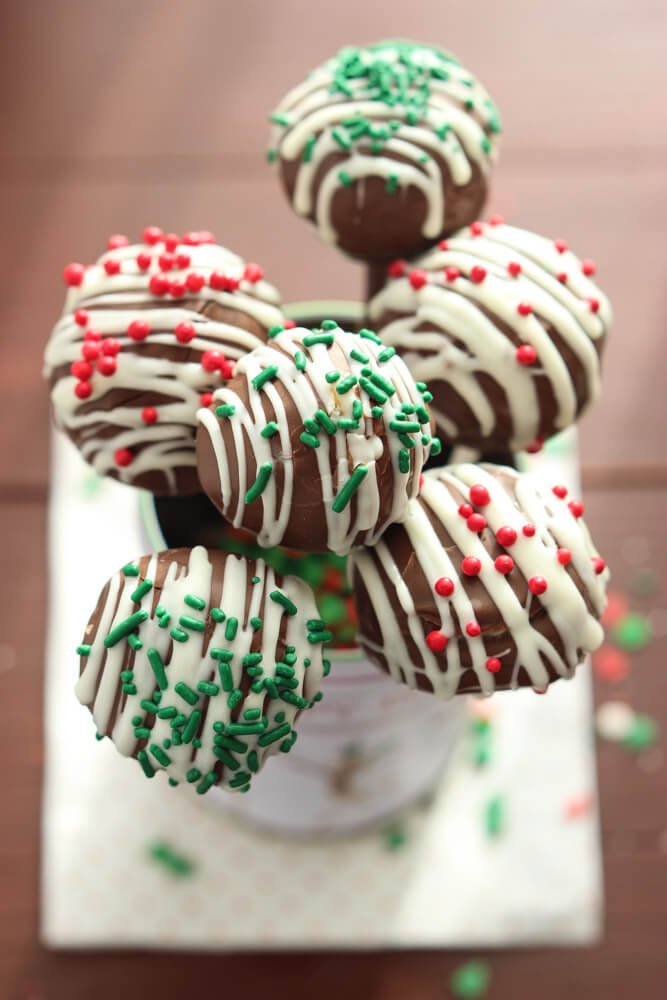
We keep our cake pop decorations fairly simple, melting white chocolate chips with coconut oil to create a drizzle for decorating, but that doesn’t mean you can’t get creative! Additional toppings include festive sprinkles, chocolate shavings, coconut flakes, chopped nuts, or candy cane pieces.
Or, try making faces and designs such as:
- Reindeers: Use pretzels for ears, candy eyes, and red candy for the nose.
- Snowmen: Use white chocolate candy melts and candies to create snowmen faces.
- Christmas Trees: Use green candy melts, or pipe frosting onto the cake pops.
- Ornaments: Experiment with different colors, and use frosting or piping gel to create designs.
Christmas Cake Pop Recipe Gifting Ideas
Almost too cute to eat, these cake pops are great for holiday parties and giving away as gifts! Wrap each cake pop in a cellophane bag, and tie a ribbon and name tag around them.
Or, use them to create delicious bouquets or as “ornaments” on a styrofoam tree. You can also stuff them into a mug and maybe add a packet of hot chocolate mix for a decadent treat. No matter how you package them, they’re always an appreciated gift.
How to Store Holiday Cake Pops
Once set, you can wrap leftover cake pops with cellophane, or transfer them to an airtight container. They will stay fresh in the fridge for up to 2 weeks.
You can also freeze finished cake pops for up to 6 weeks! Thaw them in the refrigerator overnight, and they’ll taste as good as new.
More Holiday Treats


If you try our cake pops, please leave a star rating and a comment letting us know how you liked the recipe.

Christmas Cake Pops Recipe
- Prep Time: 2 hours 30 mins
- Cook Time: 25 mins
- Total Time: 2 hours 55 mins
- Yield: 50–55 cake pops 1x
- Category: Dessert
- Method: Baked
- Cuisine: American
Description
Festive Christmas cake pops made entirely without a pan!
Ingredients
- 2 cups all-purpose flour
- 2 cups granulated sugar
- 1 tsp. baking soda
- 3 eggs
- 1 cup buttermilk
- 1 cup water, room temperature
- ⅔ cup vegetable oil
- ½ cup unsalted butter, at room temperature
- 1 (14 oz.) can sweetened condensed milk
- 1 (16 oz). bag chocolate candy melts
- ½ cup white chocolate chips (you may require little less or more depending on design)
- 1 tsp. shortening
- Christmas sprinkles
- Special tools: cake pop sticks, 4-12X4 styrofoam blocks
Instructions
- Preheat the oven on 350F.
- Butter 9X13 (rectangular) cake pan.
- In a medium bowl, combine the flour, sugar, and baking soda; set aside.
- In a large bowl, mix the eggs, buttermilk, water, and vegetable oil with a wooden spoon until combined. Gradually whisk in the flour mixture.
- Transfer the cake batter to the prepared cake pan and bake 20-25 minutes or until a toothpick inserted in the middle comes out clean. Cool the cake in the pan on a wire rack.
- In a medium bowl, cream the butter with a hand held mixer on medium speed until smooth. Add the condensed milk and beat to combine.
- Cut the cake into any small size pieces (while it is still in the pan). Transfer the cake pieces to a large mixing bowl and with hands, crumble the cake pieces into small crumbs. Note: cake will be moist and sticky.
- Add the condensed mixture to the cake crumbs and mix to combine. Cover the bowl with plastic wrap and chill in the refrigerator for 1 hour.
- Line two large baking sheets with parchment paper. Using your hands or a small cookie batter scoop, make 1-1 ½ inch balls out of the cake batter and placing on the prepared cookie sheet in a single layer. Chill the cake balls in the refrigerator for 2 hours.
- Insert the pop sticks halfway into the cake balls. Note: you want to make sure not to poke through the opposite end of the cake ball or your cake pops will not hold on. Chill in the freezer for 30 minutes.
- In a deep microwave safe bowl, microwave half of the candy melts for about 1 ½ minutes or until smooth, stirring every 30 seconds. Note: I found that working with batches of melted chocolate melts is much easier than melting the whole bag at once. So you can melt remaining chocolate as needed.
- Dip each cake pop in the chocolate, coating evenly and letting the extra chocolate to drip back in the bowl. Insert the cake pops in the styrofoam block to set. Repeat with the remaining cake pops.
- To decorate: melt the semi-sweet chocolate chips with shortening in a microwave safe bowl until smooth, stirring every 30 seconds (about 1 ½ minutes total).
- Place the chocolate into a small ziplock bag with the tip cut off and drizzle over the cake pops. Immediately cover with decorative sprinkles. Let stand at room temperature until set.
- Remove from the styrofoam block and enjoy!
Notes
(1) If you find that your cake pops are too soft or that the stick is not staying in, pop them in the refrigerator or freezer for a bit longer.
(2) To make chocolate cake pops, add ¾ cup of unsweetened cocoa powder to the batter.
(3) Total time does not take into consideration the time it takes to chill the cake mixture and pops.
Nutrition
- Serving Size: 1 cake pop
- Calories: 110
- Sugar: 9.7 g
- Sodium: 37.7 mg
- Fat: 5.9 g
- Carbohydrates: 13.5 g
- Protein: 1.2 g
- Cholesterol: 17.2 mg
Hi! I'm Katya -- a former corporate paralegal turned full-time recipe developer and blogger behind Little Broken. Here you'll find family-friendly and seasonal recipes made from real ingredients.


Hi there! I’m planning on making these as gifts for friends. How long do they keep?
Dipped cake pops should last in the refrigerator for up to 1 week when tightly wrapped or stored in an airtight container.
These are gorgeous Katya! I make cake pops too, they are a lot of work, but fun to make. 🙂
Yes they are a little work but so much fun to make!!! Thanks Valya.